Defensive Architecture: The Sim-City and Wall-In
Your "Sim-City" at the natural expansion is not a suggestion — it is your lifeline. The precise placement of the Forge, Gateway, and Pylons to create a physical barrier is the mandatory foundation of the Forge Fast Expand (FFE). If your wall is sloppy, Zerglings get in and the game can end right there.
A perfect wall-in lets you survive "9 Pool" or "9 Pool Speed" openings without over-investing in excessive defensive structures. A "Gate on top, Forge on bottom" configuration is the standard for preventing Zergling run-bys. Fail here, and everything downstream collapses.
— the foundation
the Hungry Build
for mid-game army
in your wall-in
Wall-In Rules — Technical Specs of the Gosu
- The Forge/Gate Rule: Gateway on top + Forge on bottom = no Zergling run-by. This is the standard configuration for blocking the natural ramp.
- The Obstacle Trap (CRITICAL): A Gateway below an obstacle is usually passable despite appearing tight. A Gateway above an obstacle is usually impassable. Never trap your own Zealots behind your wall.
- Directional Blocking: A Gateway to the left, or a Forge to the right of a neutral obstacle, is often impassable — use terrain to your advantage.
- The 1-Matrix Gap: Your wall must leave exactly one-matrix width open. Dragoons pass freely; two Zealots on Hold Position block an entire Zergling army cold.
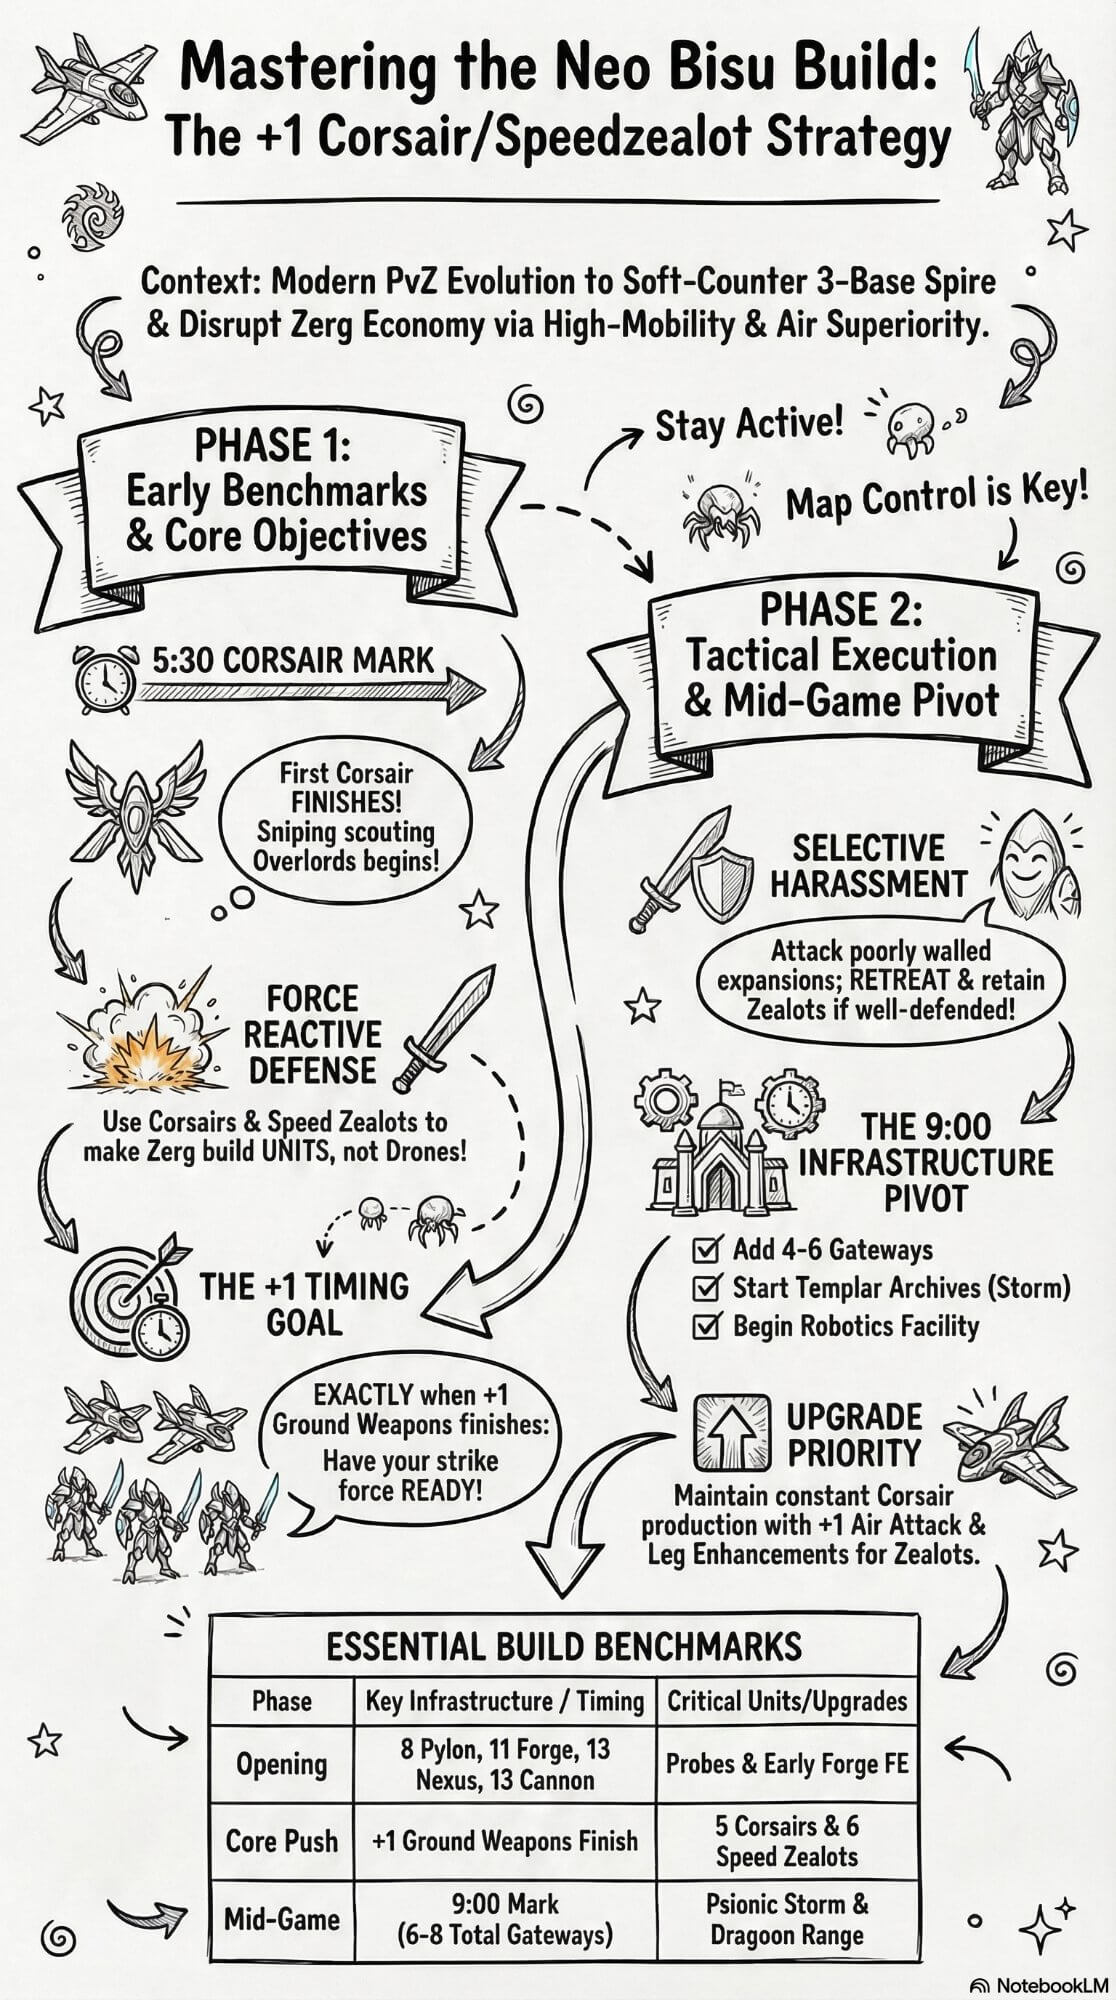
There is also a greedier version — the "Hungry Build" — where you tech faster but are more exposed and a bit poorer. It can pay off if you handle it well, especially with faster Corsairs: 8 Pylon → 11 Forge → 13 Photon ×2 → 15 Nexus + Gate.
Always Know What the Zerg Is Doing
Scouting is the fundamental aspect of PvZ. The constant process of using Probes and Corsairs to identify Zerg intentions is what keeps you ahead. Missing a tech transition — a Spire, a Hydra Den, a Defiler Mound — leads to an instant loss.
Scouting in PvZ is not just "go look at their base." You are trying to figure out their plan. Every building, every gas timing, even how they use their Larvae tells you something. If they are saving Larvae while your Probe is nearby, that usually means they are about to flood units the moment you leave.
Never let your Probe sit idle. Check for Speedling upgrades at the Pool. Most critically: watch the Larva count. If the Zerg is banking Larvae while your Probe is present, they are waiting to mass-produce the moment you leave. That is your signal to prepare.
| Observation | Probable Threat | Protoss Counter |
|---|---|---|
| Early Gas + 2 Hatch + Fast Lair | Fast Mutalisks or Lurkers | 1–2 Main Cannons; Stargate complete; Archons |
| 3 Hatch + Late Gas (No Lair) | Pure Hydralisk Bust | Cancel Probes; Mass Cannons; Psi Storm |
| Nat Gas + Missing 4th/5th Hatch | High-count Mutalisk All-In | 3–4 Main Cannons; 2–3 Corsairs; Archons |
| 4–5 Hatcheries visible | Macro Zerg (Neo-Sauron) | Proceed with 6+ Gateways — full army timing |
| Gas + No Lair + Idle Larvae | Speedling break | Block entrance with Probes/Zealots; extra Cannons immediately |
| No Spire by Corsair timing | Ling/Hydra/Lurker push | Pivot to Sair-DT or Sair-Reaver |
If you know what is coming, you can prepare and stay in control. If you do not scout, you are basically guessing — and that is how you lose games quickly.
Timing-Based Aggression: The Manly Commitment
You cannot win PvZ by turtling. Passive play hands the Zerg uncontested map control and allows them to explode into a "Neo-Sauron" economy — five or more Hatcheries pumping Larvae at a rate no defensive Protoss army can match.
You must attack, harass, and force decisions. Every Larva the Zerg spends on a Zergling or a Sunken Colony is a Larva that is not a Drone. Timing aggression is not mindless suicide — it is a calculated distraction.
It is not about throwing your army away. It is about making them uncomfortable and slowing them down. By using your army to harass newly created expansions or pick off Overlords, you force the Zerg to spend Larva on Sunkens and Units instead of Drones.
A timing attack is successful even if it does not kill the Zerg. By harassing new expansions or picking off Overlords, you force Larva onto Sunkens and combat units instead of Drones. You win the economic war without firing a single decisive blow.
turtle in PvZ
disrupt immediately
you are destroying
decisive timing push
"The worst thing to do in PvZ is to actually believe that PvZ is imbalanced." Confidence to contest the map and composure to execute under pressure is the only path to expert-level play. Every loss is a scouting lesson, not a balance complaint.
Putting It All Together
At a certain point, these three ideas stop being separate things and start working together as one system.
Wall → Scouting
A solid wall buys you breathing room. Because you are not panicking about Zerglings getting in, you can spend gas on Corsairs and actually scout. If your wall is bad, all your money goes into emergency units and you are playing blind.
Scouting → Attacks
What you scout should directly shape your next move. If you see they are going Hydras instead of Mutas, you do not need to overbuild air defence — you can shift into Zealots or tech into High Templar. Good information lets you hit at the right time with the right composition.
Attacks → Safer Defence
When you are active on the map — poking, pressuring, forcing reactions — the Zerg has to stay home more. That takes pressure off your wall and gives you space to expand and build toward your late-game army.
Your wall lets you scout. Your scouting tells you how to attack. Your attacks make your defences more efficient. It is all connected — learn it, trust it, execute it.
The Protoss Commander’s Glossary
PvZ has a vocabulary developed in the Korean professional scene and adopted across the Bulgarian StarCraft community. Understanding these terms is essential for consuming replays, guides, and coaching content.
| Term | Definition |
|---|---|
| Chogoling | Speed-upgraded Zerglings (Chogo = Speed). The primary early-game threat to your wall-in. |
| Magu Magu | Mass or excessive. "Magu Magu Photons" = overbuilt Cannon defence, usually a sign of panic. |
| Neo-Sauron | A Zerg macro style (5+ Hatcheries) relying on overwhelming Hydralisk production. Your worst nightmare if uncontested. |
| Sair (Corsair) | The primary scouting and anti-air unit. Essential for Overlord hunting and confirming or denying Spire tech. |
| Sim City | Strategic building placement creating narrow chokes that physically block Zergling pathing. |
| Speedlots | Zealots with Leg Augmentation. Transforms them from containable to genuinely threatening in the open. |
| Storm (Psi Storm) | High Templar ability; the primary Protoss counter to mass Hydralisks and Cracklings. |
| Sunken Colony | Zerg ground defence. Never commit your army into a Sunken line without a decisive advantage elsewhere. |
| Sunkenlisk | A Zerg player hiding behind mass Sunkens while teching directly to Mutalisks. Counter with Sair-DT or Reaver drops. |
| 9 Pool | Standard Zerg opening — early Spawning Pool for fast Zerglings. Your FFE must survive this. |
| Scourge | Zerg suicide air units (called Kamikaze in Bulgaria). Range-dance your Corsairs or use Archons to negate. |
| Lurker Contain | Burrowed Lurkers trapping Protoss at the natural. Requires Shuttles with Reavers and Observers to break. |
Final Words of Advice
PvZ is a match-up of nerves. The Zerg swarm is visually overwhelming by design — a wall of carapace pressing into your base. That pressure is psychological as much as mechanical. The player who stays calm and executes with precision wins the vast majority of games at every level below the Korean professional scene.
"Stay calm, stay confident, and never let the Zerg breathe. If you lose, don’t whine about balance, don’t become a Terran. Every loss is a lesson in timing and scouting. Losing is the best way to get better."
1. Wall-in placed correctly before 9 Pool arrives. 2. Probe scouting the Zerg base by 1:30. 3. Corsairs out in time to confirm or deny Spire. 4. Tech path identified — counter selected. 5. Timing attack launched before Neo-Sauron economy becomes unbeatable. 6. Third base taken under cover of the attack. Never skip a step.